少年意气强不羁,虎胁插翼白日飞。这篇文章主要讲述Android CTS(frome google)相关的知识,希望能为你提供帮助。
Compatibility Test SuiteHow does the CTS work?The Compatibility Test Suite (CTS) is a free, commercial-grade test suite, available for
download. The CTS represents the "mechanism" of compatibility.
The CTS runs on a desktop machine and executes test cases directly on attached devices or an emulator. The CTS is a set of unit tests designed to be integrated into the daily workflow (such as via a continuous build system) of the engineers building a device. Its intent is to reveal incompatibilities early on, and ensure that the software remains compatible throughout the development process.
The CTS is an automated testing harness that includes two major software components:
- The CTS tradefed test harness runs on your desktop machine and manages test execution.
- Individual test cases are executed on the Device Under Test (DUT). The test cases are written in java as JUnit tests and packaged as android .apk files to run on the actual device target.
The CTS Verifier is a tool for manual testing and includes the following software components:
- The CTS verifier app that is executed on the DUT and collects the results.
- The executable(s) or script(s) that are executed on the desktop machine to provide data or additional control for some test cases in the CTS Verifier app.
文章图片
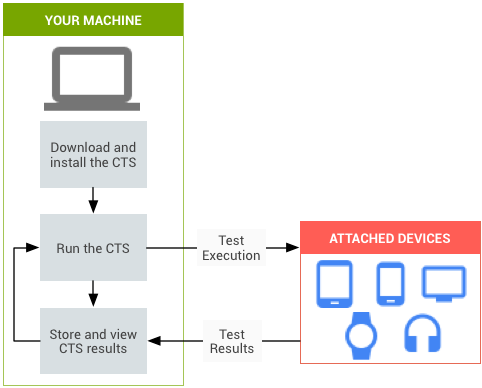
Figure 1. How to use CTS
This diagram summarizes CTS workflow. Please refer to the subpages of this section starting with Setup for detailed instructions.
Types of test casesThe CTS includes the following types of test cases:
- Unit tests
test atomic units of code within the Android platform;
e.g. a single class, such as java.util.HashMap.
- Functional tests
test a combination of APIs together in a higher-level use-case.
- Robustness tests
test the durability of the system under stress.
- Performance tests
test the performance of the system against defined benchmarks, for example rendering frames per second.
| Area | Description |
|---|---|
| Signature tests | For each Android release, there are XML files describing the signatures of all public APIs contained in the release. The CTS contains a utility to check those API signatures against the APIs available on the device. The results from signature checking are recorded in the test result XML file. |
| Platform API Tests | Test the platform (core libraries and Android Application Framework) APIs as documented in the SDK Class Index to ensure API correctness, including correct class, attribute and method signatures, correct method behavior, and negative tests to ensure expected behavior for incorrect parameter handling. |
| Dalvik Tests | The tests focus on testing the Dalvik Executable Format. |
| Platform Data Model | The CTS tests the core platform data model as exposed to application developers through content providers, as documented in the SDK android.provider package: contacts, browser, settings, etc. |
| Platform Intents | The CTS tests the core platform intents, as documented in the SDK Available Intents. |
| Platform Permissions | The CTS tests the core platform permissions, as documented in the SDK Available Permissions. |
| Platform Resources | The CTS tests for correct handling of the core platform resource types, as documented in the SDK Available Resource Types. This includes tests for: simple values, drawables, nine-patch, animations, layouts, styles and themes, and loading alternate resources. |
CTS tests require a Wi-Fi network that supports IPv6, can treat the Device Under Test (DUT) as an isolated client, and has an internet connection. An isolated client refers to a configuration where the DUT does not have visibility to the broadcast/multinetwork messages on that subnetwork, either by a Wi-Fi AP configuration or by running the DUT on an isolated sub-network without other devices being connected.
If you don‘t have access to a native IPv6 network, an IPv6 carrier network, or a VPN to pass some tests depending on IPv6, you may instead use a Wi-Fi access point and an IPv6 tunnel. See Wikipedia list of IPv6 tunnel brokers.
Bluetooth LE beacons
If the DUT supports the Bluetooth LE feature, then at least three Bluetooth LE beacons should be placed within five meters of the DUT for Bluetooth LE scan testing. Those beacons can be any kind, do not need to be configured or emit anything specific, and can include iBeacon, Eddystone, or even devices simulating BLE beacons.
Desktop machine setupCTS currently supports 64-bit Linux and Mac OS host machines.
ADB and AAPT
Before running the CTS, make sure you have recent versions of both Android Debug Bridge (adb) and Android Asset Packaging Tool (AAPT) installed and those tools‘ location added to the system path of your machine.
To install ADB, download the Android SDK Tools package for your operating system, open it, and follow the instructions in the included README file. For troubleshooting information, see Installing the Stand-alone SDK Tools.
Ensure
adb
and
aapt
are in your system path. The following command assumes you‘ve opened the package archive in your home directory:$ export PATH=$PATH:$HOME/android-sdk-linux/build-tools/< version>
Note: Please ensure your starting path and directory name are correct.
Java Development Kit (JDK)
Install the proper version of the Java Development Kit (JDK). See the JDK requirements.
CTS files
Download and open the CTS packages matching your devices‘ Android version and all the Application Binary Interfaces (ABIs) your devices support.
Download and open the latest version of the CTS Media Files.
Device detection
Follow the step to set up your system to detect your device, such as creating a
udev
rules file for Ubuntu Linux.Android device setupUser builds
A compatible device is defined as a device with a user/release-key signed build, so your device should be running a system image based on the known to be compatible user build (Android 4.0 and later) from Codenames, Tags, and Build Numbers.
Caution: When used to confirm Android compatibility of your final system image, CTS must be executed on devices with a user build.
Storage requirements
The CTS media stress tests require video clips to be on external storage (
/sdcard). Most of the clips are from
Big Buck Bunny
which is copyrighted by the Blender Foundation under the
Creative Commons Attribution 3.0 license.The required space depends on the maximum video playback resolution supported by the device (See section 5 in the compatibility definition document for the platform version of the required resolutions.) Note that the video playback capabilities of the device under test will be checked via the
android.media.CamcorderProfile
APIs for earlier versions of Android and the
android.media.MediaCodecInfo.CodecCapabilities
APIs from Android 5.0.Here are the storage requirements by maximum video playback resolution:
- 480x360: 98MB
- 720x480: 193MB
- 1280x720: 606MB
- 1920x1080: 1863MB
- Any device that does not have an embedded screen needs to be connected to a screen.
- If the device has a memory card slot, plug in an empty SD card.
Use an SD card that supports Ultra High Speed (UHS) Bus with SDHC or SDXC capacity or one with at least speed class 10 or higher to ensure it can pass the CTS.Warning:
CTS may modify/erase data on the SD card plugged into the device.
- If the device has SIM card slots, plug in an activated SIM card to each slot. If the device supports SMS, each SIM card should have its own number field populated.
In order to run CTS carrier API tests, the device needs to has a SIM card with carrier privilege rules on it. SeePreparing the UICC.
Android device configuration
- Factory data reset the device:
Settings >
Backup &
reset >
Factory data resetWarning:
This will erase all user data from the device.
- Set your device‘s language to English (United States) from: Settings > Language & input > Language
- Turn on the location setting if there is a GPS or Wi-Fi / Cellular network feature on the device: Settings > Location > On
- Connect to a Wi-Fi network that supports IPv6, can treat the Device Under Test (DUT) as an isolated client (see the Physical Environment section above), and has an internet connection: Settings > Wi-Fi
- Make sure no lock pattern or password is set on the device: Settings > Security > Screen lock > None
- Enable
USB debugging
on your device:
Settings >
Developer options >
USB debugging.Note:
On Android 4.2 and later,
Developer options
is hidden by default. To make them available, go toSettings >
About phone
and tap
Build number
seven times. Return to the previous screen to find
Developer options. See
Enabling On-device Developer Options
for additional details.
- Select: Settings > Developer options > Stay Awake > On
- Select:
Settings >
Developer options >
Allow mock locations >
OnNote:
This mock locations setting is applicable only in Android 5.x and 4.4.x.
- Select:
Settings >
Developer options >
Verify apps over USB >
OffNote:
This verify apps step became required in Android 4.2.
- Launch the browser and dismiss any startup/setup screen.
- Connect the desktop machine that will be used to test the device with a USB cableNote:
When you connect a device running Android 4.2.2 or later to your computer, the system shows a dialog asking whether to accept an RSA key that allows debugging through this computer. Select
Allow USB debugging.
- Install and configure helper apps on the device.Note:
For CTS versions 2.1 R2 through 4.2 R4, set up your device (or emulator) to run the accessibility tests with:
adb install -r android-cts/repository/testcases/CtsDelegatingAccessibilityService.apk
On the device, enable: Settings > Accessibility > Accessibility > Delegating Accessibility Service
Note: For CTS 2.3 R4 through CTS 6.0 on devices that declare theandroid.software.device_admin feature, set up your device to run the device administration tests with:adb install -r android-cts/repository/testcases/CtsDeviceAdmin.apk
On the device, enable only the twoandroid.deviceadmin.cts.CtsDeviceAdminReceiver*device administrators under: Settings > Security > Select device administrators. Make sure theandroid.deviceadmin.cts.CtsDeviceAdminDeactivatedReceiverand any other preloaded device administrators stay disabled in the same menu.
- Copy the CTS media files to the device as follows:Note:
For CTS 2.3 R12 and beyond, if the device supports video codecs, the CTS media files must be copied to the device.
- Navigate (cd) to the path the media files are downloaded and unzipped to.
- Change the file permissions:
chmod u+x copy_media.sh - Run
copy_media.sh:- To copy clips up to a resolution of 720x480, run:
./copy_media.sh 720x480 - If you are not sure about the maximum resolution, try
./copy_media.sh allso that all files are copied. - If there are multiple devices under adb, add the -s (serial) option to the end. For example, to copy up to 720x480 to the device with serial 1234567, run:
./copy_media.sh 720x480 -s 1234567
- To copy clips up to a resolution of 720x480, run:
To run a test plan:
- Connect at least one device.
- Press the home button to set the device to the home screen at the start of CTS.
- While a device is running tests, it must not be used for any other tasks and must be kept in a stationary position (to avoid triggering sensor activity) with the cameras pointing at an object that could be focused.
- Do not press any keys on the device while the CTS is running. Pressing keys or touching the screen of a test device will interfere with the running tests and may lead to test failures.
- Launch the CTS console by running the
cts-tradefed
script from the folder where the CTS package has been unzipped, e.g.
$ ./android-cts/tools/cts-tradefed - You may start the default test plan (containing all of the test packages) by appending:
run cts --plan CTS(or justrun ctsfor v2). This kicks off all the CTS tests required for compatibility. Enterlist plansto see a list of test plans in the repository. Enterlist packagesto see a list of test packages in the repository. See the CTS command reference or type help for a complete list of supported commands. - Alternately, you may run the CTS plan of your choosing from the command line using:
cts-tradefed run cts --plan<
plan_name>
Note: When running Android 6.0 (Marshmallow) CTS only, we recommend you use the--skip-preconditionsoption to skip the experimental pre-conditions feature that may cause issues for when executing CTS tests.
- View test progress and results reported on the console.
- If your device is Android 5.0 or later and declares support for an ARM and a x86 ABI, you should run both the ARM and x86 CTS packages.
Selecting plans
The following test plans are available:
- CTS—all tests required for compatibility.
- Signature—the signature verification of all public APIs
- Android—tests for the Android APIs
- Java—tests for the Java core library
- VM—tests for ART or Dalvik
- Performance—performance tests for your implementation
run cts
command.CTS v1 console command reference
Table 1. This table summarizes the CTS v1 console commands for various uses.
| Host | Description |
|---|---|
help |
Display a summary of the most commonly used commands |
help all |
Display the complete list of available commands |
exit |
Gracefully exit the CTS console. Console will close when all currently running tests are finished |
| Run | Description |
run cts |
Run the specified tests and displays progress information. One of
--plan,
--package,
--class
or
--continue-session
needs to be specifiedThe CTS console can accept other commands while tests are in progressIf no devices are connected, the CTS desktop machine (or host) will wait for a device to be connected before starting tests If more than one device is connected, the CTS host will choose a device automatically |
--plan <
test_plan_name>
|
Run the specified test plan |
--package/-p <
test_package_name>

[--package/-p <
test_package2>
...] |
Run the specified test packages |
--class/-c <
class_name>
 [--method/-m <
test_method_name>
|
Run the specified test class and/or method |
--continue-session |
Run all not executed tests from previous CTS session; the sessions testResult.xml will be updated with the new results |
--shards
<
number_of_shards>
|
Shard a CTS run into given number of independent chunks, to run on multiple devices in parallel |
--serial/-s <
deviceID>
|
Run CTS on the specific device |
-t <
class_name>
#<
test_method_name>
|
Run a specific test method |
--force-abi 32|64 |
On 64-bit devices, run the test against only the 32-bit or 64-bit ABI |
| List | Description |
list packages |
List all available test packages in the repository |
list plans |
List all available test plans in the repository |
list invocations |
List ‘run‘ commands currently being executed on devices |
list commands |
List all ‘run‘ commands currently in the queue waiting to be assigned to devices |
list results |
List CTS results currently stored in repository |
list devices |
List currently connected devices and their state
‘Available‘ devices are functioning, idle devices, available for running tests ‘Unavailable‘ devices are devices visible via adb, but are not responding to adb commands and won‘t be allocated for tests ‘Allocated‘ devices are devices currently running tests |
| Add | Description |
add derivedplan --plan <
plan_name>
|
Create a plan derived from given result session; use this option to rerun reports and validate test issues |
Selecting plans
Available test plans include the following:
- cts—Runs CTS from an pre-existing CTS installation.
- cts-camera— Runs CTS-camera from a pre-existing CTS installation.
- cts-java— Runs Core Java Tests from a pre-existing CTS installation.
- cts-pdk— Runs Tests useful on validating a PDK fusion build.
- everything— Common config for Compatibility suites.
- basic-reporters— Configuration with basic CTS reporters.
- collect-tests-only—Runs CTS from a pre-existing CTS installation.
- common-compatibility-config— Common config for Compatibility suites.
- cts-filtered-sample— Common config for Compatibility suites.
- cts-known-failures— Configuration with CTS known failures.
- cts-preconditions— CTS precondition configs.
- host— Runs a single host-based test on an existing device.
- instrument— Runs a single Android instrumentation test on an existing device.
- native-benchmark— Runs a native stress test on an existing device.
- native-stress— Runs a native stress test on an existing device.
- recharge— A fake test that waits for nearly-discharged devices and holds them for charging.
- testdef— Runs tests contained in test_def.xml files on an existing device.
- util/wifi— Utility config to configure Wi-Fi on device.
- util/wipe— Wipes user data on device.
run cts
command.CTS v2 console command reference
Table 1. This table summarizes the CTS V2 console commands for various uses.
| Host | Description |
|---|---|
help |
Display a summary of the most commonly used commands |
help all |
Display the complete list of available commands |
version |
Show the version. |
exit |
Gracefully exit the CTS console. Console will close when all currently running tests are finished. |
| Run | Description |
run cts |
Run the default CTS plan (that is, the full CTS invocation). The CTS console can accept other commands while tests are in progress. If no devices are connected, the CTS desktop machine (or host) will wait for a device to be connected before starting tests. If more than one device is connected, the CTS host will choose a device automatically. |
--plan <
test_plan_name>
|
Run the specified test plan. |
-- module/-m <
test_module_name>

[--module/-m <
test_module2>
...] |
Run the specified test module or modules. For example,
run cts --module CtsGestureTestCases
executes the gesture test module (this can be shortened to
run cts -m Gesture).run cts -m Gesture --test android.gesture.cts.GestureTest#testGetStrokes
runs the specific package, class, or test. |
-- module/-m <
test_module_name>
 -- test <
test_name>
|
Run the specified module and test. For example,
run cts -m Gesture --test android.gesture.cts.GestureTest#testGetStrokes
runs the specific package, class, or test. |
--retry |
Retry all tests that failed or were not executed from the previous sessions. Use
list results
to get the session id. |
--shards
<
number_of_shards>
|
Shard a CTS run into given number of independent chunks, to run on multiple devices in parallel. |
--serial/-s <
deviceID>
|
Run CTS on the specific device. |
--include-filter <
module_name>

[--include-filter <
module2>
...] |
Run only with the specified modules. |
--exclude-filter <
module_name>

[--exclude-filter <
module2>
...] |
Exclude the specified modules from the run. |
--log-level-display/-l <
log_level>
|
Run with the minimum specified log level displayed to STDOUT. Valid values: [VERBOSE, DEBUG, INFO, WARN, ERROR, ASSERT]. |
--abi <
abi_name>
|
Force the test to run on the given ABI, 32 or 64. By default CTS runs a test once for each ABI the device supports. |
--logcat,
--bugreport, and
--screenshoot-on-failure |
Give more visibility into failures and can help with diagnostics. |
--device-token |
Specifies a given device has the given token eg.
--device-token 1a2b3c4d:sim-card.. |
--skip-device-info |
Skips collection of information about the device. Note: do not use this option when running CTS for approval. |
--skip-preconditions |
Bypasses verification and setup of the device‘s configuration, such as pushing media files or checking for Wi-Fi connection. |
| List | Description |
list modules |
List all available test modules in the repository. |
list plans
or
list configs |
List all available test plans (configs) in the repository. |
list invocations |
List ‘run‘ commands currently being executed on devices. |
list commands |
List all ‘run‘ commands currently in the queue waiting to be assigned to devices. |
list results |
List CTS results currently stored in repository. |
list devices |
List currently connected devices and their state.
‘Available‘ devices are functioning, idle devices, available for running tests. ‘Unavailable‘ devices are devices visible via adb, but are not responding to adb commands and won‘t be allocated for tests. ‘Allocated‘ devices are devices currently running tests. |
| Dump | Description |
dump logs |
Dump the tradefed logs for all running invocations. |
Interpreting CTS resultsThe CTS test results are placed in the file:
$CTS_ROOT/android-cts/repository/results/< start_time> .zip
If you have built the CTS yourself, $CTS_ROOT will resemble the path out/host/linux-x86/cts but differ by platform. This reflects the path where you have uncompressed the prebuilt official CTS downloaded from this site.
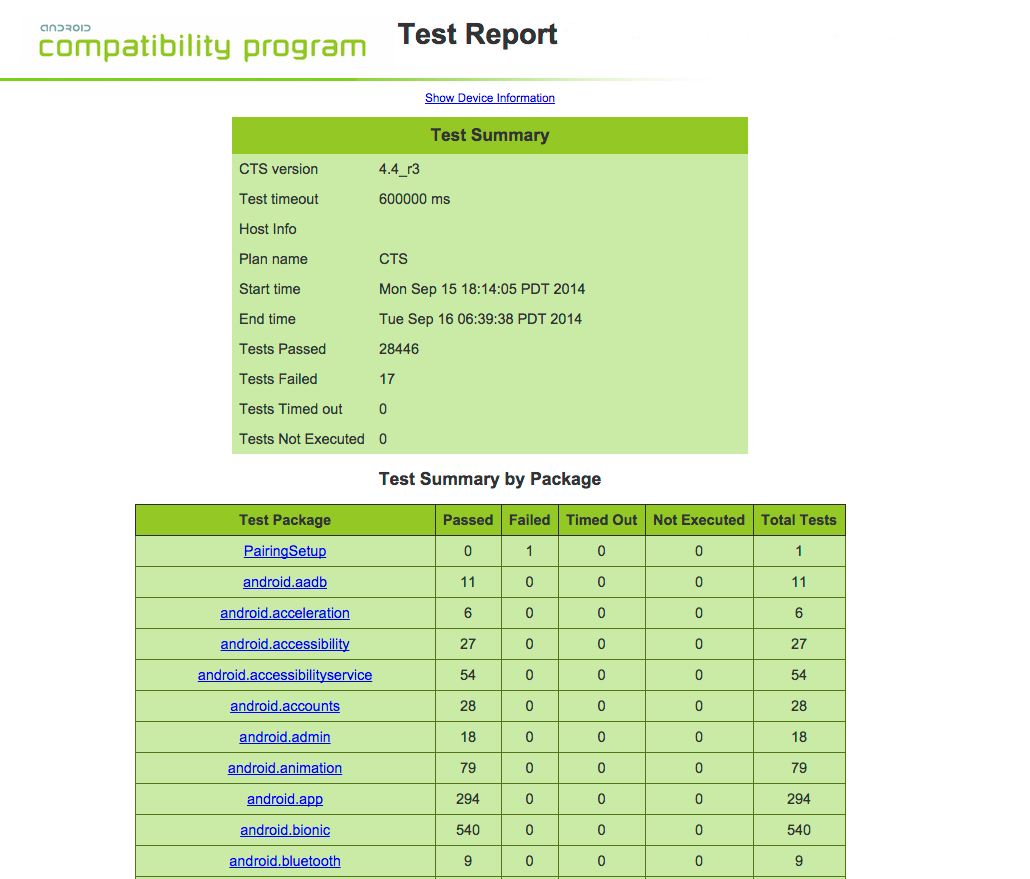
Inside the zip, the testResult.xml file contains the actual results—open this file in any web browser (html5 compatible browser recommended) to view the test results. It will resemble the following screenshots.
Note: The results are provided to help you ensure the software remains compatible throughout the development process and act as a common format for communicating the compatibility status of your device with other parties.
文章图片
Figure 1. CTS test summary
If testResult.xml displays a blank page when using the Chrome browser, change your browser configuration to enable the --allow-file-access-from-files command line flag.
The Device Information section provides details about the device, firmware (make, model, firmware build, platform), and device hardware (screen resolution, keypad, screen type). To access device information, click the link above Test Summary.
The Test Summary section provides executed test plan details, like the CTS plan name and execution start and end times. It also presents an aggregate summary of the number of tests that passed, failed, timed out, or could not be executed.
The next section also provides a summary of tests passed per package.
文章图片
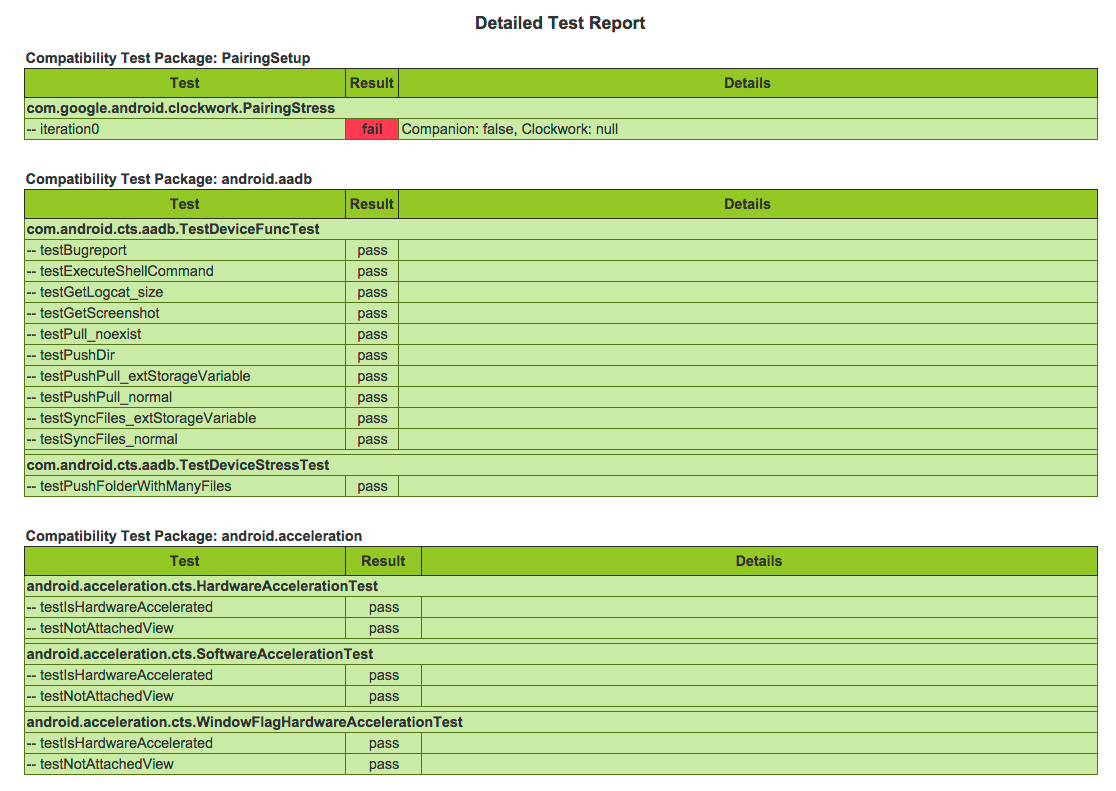
Figure 2. CTS test report
This is followed by details of the the actual tests that were executed. The report lists the test package, test suite, test case, and the executed tests. It shows the result of the test execution—pass, fail, timed out, or not executed. In the event of a test failure details are provided to help diagnose the cause.
Further, the stack trace of the failure is available in the XML file but is not included in the report to ensure brevity—viewing the XML file with a text editor should provide details of the test failure (search for the < Test> tag corresponding to the failed test and look within it for the < StackTrace> tag).
【Android CTS(frome google)】
推荐阅读


- 移动开发安卓Lab2(01)
- android 学习随笔二十七(JNI(Java Native Interface,JAVA原生接口 ))
- Android瀑布流照片墙实现,体验不规则排列的美感
- Android多点触控技术实战,自由地对图片进行缩放和移动
- Android真机连接手机Target显示unknown cmd命令下adb devices 显示offline
- Android 手机卫士8--删除通话记录
- Android 架构 4.总结
- android的相对布局
- Android CTS