【Android中Context详解】智者不为愚者谋,勇者不为怯者死。这篇文章主要讲述Android中Context详解相关的知识,希望能为你提供帮助。
Context,中文直译为“上下文”,SDK中对其说明如下:
Interface to global information about an application environment. This is an abstract class whose implementation
is provided by the android system. It allows access to application-specific resources and classes, as well as up-calls
for application-level operations such as launching activities, broadcasting and receiving intents, etc
从上可知一下三点,即:
1、它描述的是一个应用程序环境的信息,即上下文。
2、该类是一个抽象(abstract class)类,Android提供了该抽象类的具体实现类(后面我们会讲到是ContextIml类)。
3、通过它我们可以获取应用程序的资源和类,也包括一些应用级别操作,例如:启动一个Activity,发送广播,接受Intent信息
等。。
于是,我们可以利用该Context对象去构建应用级别操作(application-level operations) 。
一、Context相关类的继承关系
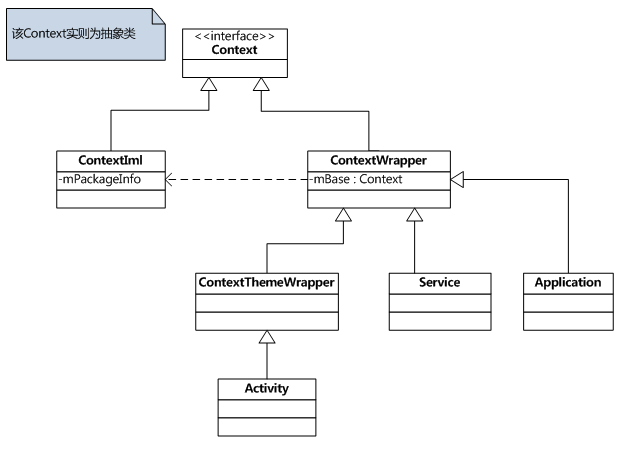
文章图片
相关类介绍:
Context类 路径: /frameworks/base/core/Java/android/content/Context.java
说明: 抽象类,提供了一组通用的API。
源代码(部分)如下:
1 public abstract class Context { 2... 3public abstract Object getSystemService(String name); //获得系统级服务 4public abstract void startActivity(Intent intent); //通过一个Intent启动Activity 5public abstract ComponentName startService(Intent service); //启动Service 6//根据文件名得到SharedPreferences对象 7public abstract SharedPreferences getSharedPreferences(String name,int mode); 8... 9 }
ContextIml.java类 路径 :/frameworks/base/core/java/android/app/ContextImpl.java
说明:该Context类的实现类为ContextIml,该类实现了Context类的功能。请注意,该函数的大部分功能都是直接调用
其属性mPackageInfo去完成,这点我们后面会讲到。
源代码(部分)如下:
1 /** 2* Common implementation of Context API, which provides the base 3* context object for Activity and other application components. 4*/ 5 class ContextImpl extends Context{ 6//所有Application程序公用一个mPackageInfo对象 7/*package*/ ActivityThread.PackageInfo mPackageInfo; 8 9@Override 10public Object getSystemService(String name){ 11... 12else if (ACTIVITY_SERVICE.equals(name)) { 13return getActivityManager(); 14} 15else if (INPUT_METHOD_SERVICE.equals(name)) { 16return InputMethodManager.getInstance(this); 17} 18} 19@Override 20public void startActivity(Intent intent) { 21... 22//开始启动一个Activity 23mMainThread.getInstrumentation().execStartActivity( 24getOuterContext(), mMainThread.getApplicationThread(), null, null, intent, -1); 25} 26 }
ContextWrapper类 路径 :\frameworks\base\core\java\android\content\ContextWrapper.java
说明: 正如其名称一样,该类只是对Context类的一种包装,该类的构造函数包含了一个真正的Context引用,即ContextIml对象。
源代码(部分)如下:
1 public class ContextWrapper extends Context { 2Context mBase; //该属性指向一个ContextIml实例,一般在创建Application、Service、Activity时赋值 3 4//创建Application、Service、Activity,会调用该方法给mBase属性赋值 5protected void attachBaseContext(Context base) { 6if (mBase != null) { 7throw new IllegalStateException("Base context already set"); 8} 9mBase = base; 10} 11@Override 12public void startActivity(Intent intent) { 13mBase.startActivity(intent); //调用mBase实例方法 14} 15 }
ContextThemeWrapper类 路径:/frameworks/base/core/java/android/view/ContextThemeWrapper.java
说明:该类内部包含了主题(Theme)相关的接口,即android:theme属性指定的。只有Activity需要主题,Service不需要主题,所以Service直接继承于ContextWrapper类。
源代码(部分)如下:
1 public class ContextThemeWrapper extends ContextWrapper { 2//该属性指向一个ContextIml实例,一般在创建Application、Service、Activity时赋值 3 4private Context mBase; 5//mBase赋值方式同样有一下两种 6public ContextThemeWrapper(Context base, int themeres) { 7super(base); 8mBase = base; 9mThemeResource = themeres; 10} 11 12@Override 13protected void attachBaseContext(Context newBase) { 14super.attachBaseContext(newBase); 15mBase = newBase; 16} 17 }
Activity类 、Service类 、Application类本质上都是Context子类, 更多信息大家可以自行参考源代码进行理解。
二、 什么时候创建Context实例
熟悉了Context的继承关系后,我们接下来分析应用程序在什么情况需要创建Context对象的?应用程序创建Context实例的
情况有如下几种情况:
1、创建Application 对象时, 而且整个App共一个Application对象
2、创建Service对象时
3、创建Activity对象时
因此应用程序App共有的Context数目公式为:
总Context实例个数 = Service个数 + Activity个数 + 1(Application对应的Context实例)
具体创建Context的时机
1、创建Application对象的时机
每个应用程序在第一次启动时,都会首先创建Application对象。如果对应用程序启动一个Activity(startActivity)流程比较
清楚的话,创建Application的时机在创建handleBindApplication()方法中,该函数位于 ActivityThread.java类中 ,如下:
1 //创建Application时同时创建的ContextIml实例 2 private final void handleBindApplication(AppBindData data){ 3... 4///创建Application对象 5Application app = data.info.makeApplication(data.restrictedBackupMode, null); 6... 7 } 8 9 public Application makeApplication(boolean forceDefaultAppClass, Instrumentation instrumentation) { 10... 11try { 12java.lang.ClassLoader cl = getClassLoader(); 13ContextImpl appContext = new ContextImpl(); //创建一个ContextImpl对象实例 14appContext.init(this, null, mActivityThread); //初始化该ContextIml实例的相关属性 15///新建一个Application对象 16app = mActivityThread.mInstrumentation.newApplication( 17cl, appClass, appContext); 18appContext.setOuterContext(app); //将该Application实例传递给该ContextImpl实例 19} 20... 21 }
2、创建Activity对象的时机
通过startActivity()或startActivityForResult()请求启动一个Activity时,如果系统检测需要新建一个Activity对象时,就会
回调handleLaunchActivity()方法,该方法继而调用performLaunchActivity()方法,去创建一个Activity实例,并且回调
onCreate(),onStart()方法等, 函数都位于 ActivityThread.java类 ,如下:
1 //创建一个Activity实例时同时创建ContextIml实例 2 private final void handleLaunchActivity(ActivityRecord r, Intent customIntent) { 3... 4Activity a = performLaunchActivity(r, customIntent); //启动一个Activity 5 } 6 private final Activity performLaunchActivity(ActivityRecord r, Intent customIntent) { 7... 8Activity activity = null; 9try { 10//创建一个Activity对象实例 11java.lang.ClassLoader cl = r.packageInfo.getClassLoader(); 12activity = mInstrumentation.newActivity(cl, component.getClassName(), r.intent); 13} 14if (activity != null) { 15ContextImpl appContext = new ContextImpl(); //创建一个Activity实例 16appContext.init(r.packageInfo, r.token, this); //初始化该ContextIml实例的相关属性 17appContext.setOuterContext(activity); //将该Activity信息传递给该ContextImpl实例 18... 19} 20... 21 }
3、创建Service对象的时机
通过startService或者bindService时,如果系统检测到需要新创建一个Service实例,就会回调handleCreateService()方法,
完成相关数据操作。handleCreateService()函数位于 ActivityThread.java类,如下:
1 //创建一个Service实例时同时创建ContextIml实例 2 private final void handleCreateService(CreateServiceData data){ 3... 4//创建一个Service实例 5Service service = null; 6try { 7java.lang.ClassLoader cl = packageInfo.getClassLoader(); 8service = (Service) cl.loadClass(data.info.name).newInstance(); 9} catch (Exception e) { 10} 11... 12ContextImpl context = new ContextImpl(); //创建一个ContextImpl对象实例 13context.init(packageInfo, null, this); //初始化该ContextIml实例的相关属性 14//获得我们之前创建的Application对象信息 15Application app = packageInfo.makeApplication(false, mInstrumentation); 16//将该Service信息传递给该ContextImpl实例 17context.setOuterContext(service); 18... 19 }
另外,需要强调一点的是,通过对ContextImp的分析可知,其方法的大多数操作都是直接调用其属性mPackageInfo(该属性类型为PackageInfo)的相关方法而来。这说明ContextImp是一种轻量级类,而PackageInfo才是真正重量级的类。而一个App里的所有ContextIml实例,都对应同一个packageInfo对象。
利用Context获取SharedPreferences类的使用方法,SharedPreferences类想必大家都使用过,其一般获取方法就是通过调用getSharedPreferences()方法去根据相关信息获取SharedPreferences对象。具体流程如下:
1 、调用 getSharedPreferences()获取对应的的文件,该函数实现功能如下:
1 //Context类静态数据集合,以键值对保存了所有读取该xml文件后所形成的数据集合 2 private static final HashMap< File, SharedPreferencesImpl> sSharedPrefs = 3new HashMap< File, SharedPreferencesImpl> (); 4 5 @Override 6 public SharedPreferences getSharedPreferences(String name, int mode){ 7//其所对应的SharedPreferencesImpl对象 ,该对象已一个HashMap集合保存了我们对该文件序列化结果 8SharedPreferencesImpl sp; 9File f = getSharedPrefsFile(name); //该包下是否存在对应的文件,不存在就新建一个 10synchronized (sSharedPrefs) {//是否已经读取过该文件,是就直接返回该SharedPreferences对象 11sp = sSharedPrefs.get(f); 12if (sp != null & & !sp.hasFileChanged()) { 13//Log.i(TAG, "Returning existing prefs " + name + ": " + sp); 14return sp; 15} 16} 17//以下为序列化该xml文件,同时将数据写到map集合中 18Map map = null; 19if (f.exists() & & f.canRead()) { 20try { 21str = new FileInputStream(f); 22map = XmlUtils.readMapXml(str); 23str.close(); 24} 25... 26} 27 28synchronized (sSharedPrefs) { 29if (sp != null) { 30//Log.i(TAG, "Updating existing prefs " + name + " " + sp + ": " + map); 31sp.replace(map); //更新数据集合 32} else { 33sp = sSharedPrefs.get(f); 34if (sp == null) { 35//新建一个SharedPreferencesImpl对象,并且设置其相关属性 36sp = new SharedPreferencesImpl(f, mode, map); 37sSharedPrefs.put(f, sp); 38} 39} 40return sp; 41} 42 }
2、 SharedPreferences 不过是个接口,它定义了一些操作xml文件的方法,其真正实现类为SharedPreferencesImpl ,该类是
ContextIml的内部类,该类如下:
1 //soga,这种形式我们在分析Context ContextIml时接触过 2 //SharedPreferences只是一种接口,其真正实现类是SharedPreferencesImpl类 3 private static final class SharedPreferencesImpl implements SharedPreferences{ 4private Map mMap; //保存了该文件序列化结果后的操作, 键值对形式 5 6//通过key值获取对应的value值 7public String getString(String key, String defValue) { 8synchronized (this) { 9String v = (String)mMap.get(key); 10return v != null ? v : defValue; 11} 12} 13... 14//获得该SharedPreferencesImpl对象对应的Edito类,对数据进行操作 15public final class EditorImpl implements Editor { 16private final Map< String, Object> mModified = Maps.newHashMap(); //保存了对键值变化的集合 17} 18 }
基本上获取SharedPreferences 对象就是这么来的。
推荐阅读


- Android Studio 连接真机调试
- android 通过wifi 热点实现手机摄像头数据共享(转)
- Android studio自动删除没用的资源
- Android性能优化之启动加速35%
- 调用 android 系统拍照结合 android-crop 裁剪图片
- android 类似QQ底部输入框弹出键盘和面板冲突 布局闪动处理方案(转)
- VirtualBox中安装Android-x86详解
- android开发学习——day3
- Android版本和API Level的对应关系