SpringBoot如何集成Caffeine()
引言
前面我们有学习Caffeine 本地缓存性能之王Caffeine,并且也提到SpringBoot默认使用的本地缓存也是Caffeine啦,今天我们来看看Caffeine如何与SpringBoot集成的。
集成caffeine
caffeine与SpringBoot集成有两种方式:
- 一种是我们直接引入
Caffeine依赖,然后使用Caffeine方法实现缓存。相当于使用原生api - 引入
Caffeine和Spring Cache依赖,使用SpringCache注解方法实现缓存。SpringCache帮我们封装了Caffeine
pom文件引入
org.springframework.boot spring-boot-starter-cachecom.github.ben-manes.caffeine caffeine2.6.0
第一种方式首先配置一个Cache,通过构造者模式构建一个Cache对象,然后后续关于缓存的增删查都是基于这个cache对象。
@Configuration
public class CacheConfig {
@Bean
public Cache caffeineCache() {
return Caffeine.newBuilder()
// 设置最后一次写入或访问后经过固定时间过期
.expireAfterWrite(60, TimeUnit.SECONDS)
// 初始的缓存空间大小
.initialCapacity(100)
// 缓存的最大条数
.maximumSize(1000)
.build();

}
第一种方式我们就一一不介绍了,基本上就是使用caffeineCache来根据你自己的业务来操作以下方法
文章图片
这种方式使用的话是对代码有侵入性的。
第二种方式 - 需要在SpingBoot启动类标上
EnableCaching注解,这个玩意跟很多框架都一样,比如我们肴集成dubbo也需要标上@EnableDubbole注解等。
@SpringBootApplication
@EnableCaching
public class DemoApplication {
public static void main(String[] args) {
SpringApplication.run(DemoApplication.class, args);

}
- 在
application.yml配置我们的使用的缓存类型、过期时间、缓存策略等。
spring:
profiles:
active: dev
cache:
type: CAFFEINE
caffeine:
spec: maximumSize=500,expireAfterAccess=600s
如果我们不习惯使用这种方式的配置,当然我们也可以使用JavaConfig的配置方式来代替配置文件。
@Configuration
public class CacheConfig {
@Bean
public CacheManager cacheManager() {
CaffeineCacheManager cacheManager = new CaffeineCacheManager();

cacheManager.setCaffeine(Caffeine.newBuilder()
// 设置最后一次写入或访问后经过固定时间过期
.expireAfterAccess(600, TimeUnit.SECONDS)
// 初始的缓存空间大小
.initialCapacity(100)
// 缓存的最大条数
.maximumSize(500));

return cacheManager;

}
接下来就是代码中如何来使用这个缓存了
@Override
@CachePut(value = "https://www.it610.com/article/user", key = "#userDTO.id")
public UserDTO save(UserDTO userDTO) {
userRepository.save(userDTO);

return userDTO;

}@Override
@CacheEvict(value = "https://www.it610.com/article/user", key = "#id")//2
public void remove(Long id) {
logger.info("删除了id、key为" + id + "的数据缓存");

}@Override
@Cacheable(value = "https://www.it610.com/article/user",key = "#id")
public UserDTO getUserById(Long id) {
return userRepository.findOne(id);

}
上述代码中我们可以看到有几个注解@CachePut、@CacheEvict、@Cacheable
我们只需要在方法上标上这几个注解,我们就能够使用缓存了,我们分别来介绍下这几个注解。
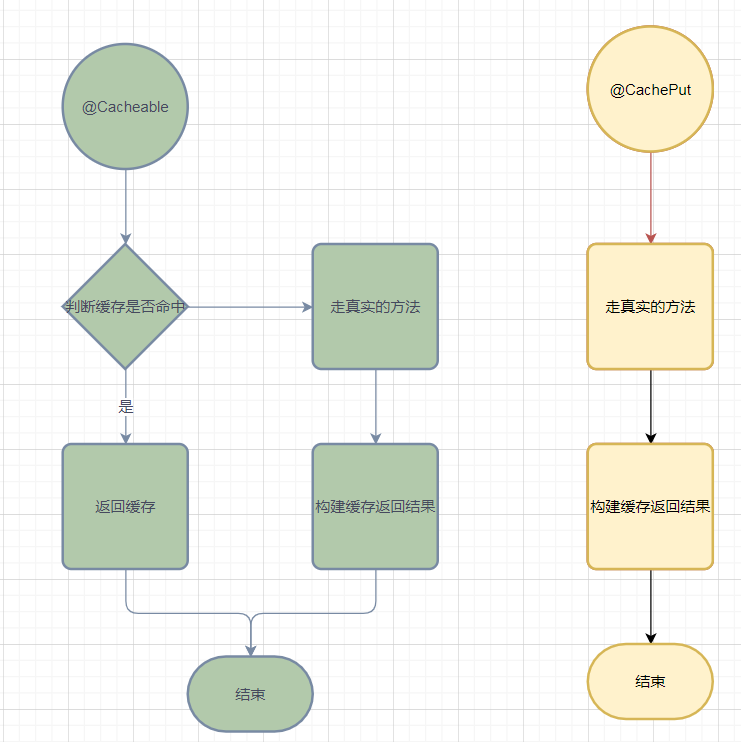
@Cacheable@Cacheable它是既可以标注在类上也可以标注在方法上,当它标记在类上的时候它表述这个类上面的所有方法都会支持缓存,同样的
当它作用在法上面时候它表示这个方法是支持缓存的。比如上面我们代码中的getUserById这个方法第一次缓存里面没有数据,我们会去查询DB,但是第二次来查询的时候就不会走DB查询了,而是直接从缓存里面拿到结果就返回了。
value 属性 @Cacheable的value属性是必须指定的,其表示当前方法的返回值是会被缓存在哪个Cache上的,对应Cache的名称。
key@Cacheable的key有两种方式一种是我们自己显示的去指定我们的key,还有一种默认的生成策略,默认的生成策略是SimpleKeyGenerator这个类,这个生成key的方式也比较简单我们可以看下它的源码:
public static Object generateKey(Object... params) {
// 如果方法没有参数 key就是一个 new SimpleKey()
if (params.length == 0) {
return SimpleKey.EMPTY;

}
// 如果方法只有一个参数 key就是当前参数
if (params.length == 1) {
Object param = params[0];

if (param != null && !param.getClass().isArray()) {
return param;

}
}
// 如果key是多个参数,key就是new SimpleKey ,不过这个SimpleKey对象的hashCode 和Equals方法是根据方法传入的参数重写的。
return new SimpleKey(params);

}
上述代码还是非常好理解的分为三种情况:
- 方法没有参数,那就new使用一个全局空的
SimpleKey对象来作为key。 - 方法就一个参数,就使用当前参数来作为
key - 方法参数大于
1个,就new一个SimpleKey对象来作为key,new这个SimpleKey的时候用传入的参数重写了SimpleKey的hashCode和equals方法,
至于为啥需要重写的原因话,就跟Map用自定义对象来作为key的时候必须要重写hashCode和equals方法原理是一样的,因为caffein也是借助了ConcurrentHashMap来实现,
小结上述代码我们可以发现默认生成key只跟我们传入的参数有关系,如果我们有一个类里面如果存在多个没有参数的方法,然后我们使用了默认的缓存生成策略的话,就会造成缓存丢失。
或者缓存相互覆盖,或者还有可能会发生ClassCastException因为都是使用同一个key。比如下面这代码就会发生异常(ClassCastException)
@Cacheable(value = "https://www.it610.com/article/user")
public UserDTO getUser() {
UserDTO userDTO = new UserDTO();

userDTO.setUserName("Java金融");

return userDTO;

}
@Cacheable(value = "https://www.it610.com/article/user")
public UserDTO2 getUser1() {
UserDTO2 userDTO2 = new UserDTO2();

userDTO2.setUserName2("javajr.cn");

return userDTO2;

}
所以一般不怎么推荐使用默认的缓存生成key的策略。如果非要用的话我们最好自己重写一下,带上方法名字等。类似于如下代码:
@Component
public class MyKeyGenerator extends SimpleKeyGenerator {@Override
public Object generate(Object target, Method method, Object... params) {
Object generate = super.generate(target, method, params);

String format = MessageFormat.format("{0}{1}{2}", method.toGenericString(), generate);

return format;

}
自定义key我们可以通过Spring的EL表达式来指定我们的key。这里的EL表达式可以使用方法参数及它们对应的属性。
使用方法参数时我们可以直接使用“#参数名”或者“#p参数index”这也是我们比较推荐的做法:
 @Cacheable(value="https://www.it610.com/article/user", key="#id")
public UserDTO getUserById(Long id) {
UserDTO userDTO = new UserDTO();

userDTO.setUserName("java金融");

return userDTO;

}
@Cacheable(value="https://www.it610.com/article/user", key="#p0")
public UserDTO getUserById1(Long id) {
return null;

}
@Cacheable(value="https://www.it610.com/article/user", key="#userDTO.id")
public UserDTO getUserById2(UserDTO userDTO) {
return null;

}
@Cacheable(value="https://www.it610.com/article/user", key="#p0.id")
public UserDTO getUserById3(UserDTO userDTO) {
return null;

}
@CachePut@CachePut指定的属性是和@Cacheable一样的,但是它们两个是有区别的,@CachePut标注的方法不会先去查询缓存是否有值,而是每次都会先去执行该方法,然后把结果返回,并且结果也会缓存起来。
Cache.ValueWrapper cacheHit = findCachedItem(contexts.get(CacheableOperation.class));
当我们使用方法上有
@Cacheable注解的时候再contexts里面会把CacheableOperation加入进去,只有contexts.get(CacheableOperation.class)取到的内容不为空的话,才会去从缓存里面取内容,否则的话cacheHit会直接返回null。至于contexts什么时候加入CacheableOperation的话我们看下SpringCacheAnnotationParser#parseCacheAnnotations这个方法就会明白的。具体的源码就不展示了,感兴趣的可以自己去翻。@CacheEvict 把缓存中数据删除,用法跟前面两个注解差不多有value和key属性,需要注意一点的是它多了一个属性
beforeInvocationbeforeInvocation这个属性需要注意下它的默认值是false,false代表的意思是再执调用方法之前不删除缓存,只有方法执行成功之后才会去删除缓存。设置为true的话调用方法之前会去删除一下缓存,方法执行成功之后还会去调用删除缓存这样就是双删了。如果方法执行异常的话就不会去删除缓存。allEntrie是否清空所有缓存内容,默认值为false,如果指定为true,则方法调用后将立即清空所有缓存
cacheable、put和evict,分别用于来指定@Cacheable、@CachePut和@CacheEvict。小结 第二种方式是侵入式的,它的实现原理也比较简单就是通过切面的方法拦截器来实现,拦截所有的方法,它的核心代码如下:看起来就跟我们的业务代码差不了多少,感兴趣的也可以去瞅一瞅。
if (contexts.isSynchronized()) {
CacheOperationContext context = contexts.get(CacheableOperation.class).iterator().next();

if (isConditionPassing(context, CacheOperationExpressionEvaluator.NO_RESULT)) {
Object key = generateKey(context, CacheOperationExpressionEvaluator.NO_RESULT);

Cache cache = context.getCaches().iterator().next();

try {
return wrapCacheValue(method, cache.get(key, () -> unwrapReturnValue(invokeOperation(invoker))));

}
catch (Cache.ValueRetrievalException ex) {
// The invoker wraps any Throwable in a ThrowableWrapper instance so we
// can just make sure that one bubbles up the stack.
throw (CacheOperationInvoker.ThrowableWrapper) ex.getCause();

}
}
else {
// No caching required, only call the underlying method
return invokeOperation(invoker);

}
}// Process any early evictions
// beforeInvocation 属性是否为true,如果是true就删除缓存
processCacheEvicts(contexts.get(CacheEvictOperation.class), true,
CacheOperationExpressionEvaluator.NO_RESULT);
// Check if we have a cached item matching the conditions
Cache.ValueWrapper cacheHit = findCachedItem(contexts.get(CacheableOperation.class));
// Collect puts from any @Cacheable miss, if no cached item is found
List cachePutRequests = new LinkedList<>();

if (cacheHit == null) {
collectPutRequests(contexts.get(CacheableOperation.class),
CacheOperationExpressionEvaluator.NO_RESULT, cachePutRequests);

}Object cacheValue;

Object returnValue;
if (cacheHit != null && !hasCachePut(contexts)) {
// If there are no put requests, just use the cache hit
cacheValue = https://www.it610.com/article/cacheHit.get();

returnValue = wrapCacheValue(method, cacheValue);

}
else {
// Invoke the method if we don't have a cache hit
returnValue = https://www.it610.com/article/invokeOperation(invoker);

cacheValue = unwrapReturnValue(returnValue);

}// Collect any explicit @CachePuts
collectPutRequests(contexts.get(CachePutOperation.class), cacheValue, cachePutRequests);
// Process any collected put requests, either from @CachePut or a @Cacheable miss
for (CachePutRequest cachePutRequest : cachePutRequests) {
cachePutRequest.apply(cacheValue);

}// Process any late evictions
processCacheEvicts(contexts.get(CacheEvictOperation.class), false, cacheValue);
return returnValue;

}
结束
- 由于自己才疏学浅,难免会有纰漏,假如你发现了错误的地方,还望留言给我指出来,我会对其加以修正。
- 如果你觉得文章还不错,你的转发、分享、赞赏、点赞、留言就是对我最大的鼓励。
- 感谢您的阅读,十分欢迎并感谢您的关注。
站在巨人的肩膀上摘苹果:
https://www.cnblogs.com/fashf...!comments
推荐阅读


- 考研英语阅读终极解决方案——阅读理解如何巧拿高分
- 如何寻找情感问答App的分析切入点
- Activiti(一)SpringBoot2集成Activiti6
- mybatisplus如何在xml的连表查询中使用queryWrapper
- MybatisPlus使用queryWrapper如何实现复杂查询
- SpringBoot调用公共模块的自定义注解失效的解决
- 解决SpringBoot引用别的模块无法注入的问题
- 如何在Mac中的文件选择框中打开系统隐藏文件夹
- 漫画初学者如何学习漫画背景的透视画法(这篇教程请收藏好了!)
- java中如何实现重建二叉树